Perception of Series Laundry Pods

Perception of Seasons Series adopt blend enzymes. Seven types of enzymes targeting specific stains:


The active content of our laundry pods is greater than 60%, it is 4 times comparing to the industry standard. As the standard laundry liquid’s active content of the industry is only 15%. The stain removal of protein type of stains is equivalent to 8 times the cleaning power of the regular laundry liquid.


The Perception of Seasons Series contains bacteria & mites removal function, with 99.9% removal rate of common bacteria and mites, protect our families efficiently.


The Perception of Seasons Series adopted large amount of natural lipase (Natural soap), natural enzymes, DTI dye transfer inhibitor, 301 softener, isomerized alcohol surfactant and other high-quality raw materials, the product has the functions of strong cleaning power, low foam easy to rinse soft color protection and other functions.


Blend Enzyme Laundry Detergent Pods


The Perception of Seasons Series used fragrances from top international fragrance companies.


Youkai Technical adopt strictly high-quality standard for R&D, quality control and production process. At the same time, great care is taken in the selection of each raw material - whether it is a water-soluble film or a fragrance, a surfactant or an auxiliary.


Concentrated, green, high-quality detergents extend the lifespan of your clothes and make your clothes look like new every day. The price of high-quality detergent may be higher, but it can wash the clothes more cleanly and care for them better, the breathability of the clothes is better, and the health of the family is better guaranteed. What's more, using high-quality detergents can also reduce environmental pollution, why not?


Why do my laundry pods not dissolve?

When we take the laundry pod from the package, do we need to cut or tear the film? The answer is no. Actually, the film of the laundry pod is a water-soluble film, that it dissolved when meets with water, therefore, you will just need to toss the laundry pod into the washing machine.


Ok, is our problem solved? Obviously, no.


One of the reasons is that those front-load washing machine consumes lesser water amount for washing and laundry pods tossed into washing machine in an improper way.


How do we avoid the problem mentioned above?

Step 1: toss the laundry pod into the empty washing machine

Step 2: put in your clothes ready for washing

Step 3: turn on the washing machine, start washing.


The reason that we toss the laundry pod into the washing machine before putting our clothes is to prevent the laundry pod being wrapped when the clothes rolled and tied together.


Does a Basin Need an Overflow?

In the early days of bathroom product design, the overflow hole was a standard feature on nearly every basin. The purpose was simple: when users forgot to turn off the faucet or when water drained too slowly, the overflow allowed excess water to return to the drain—clearly showing the benefits of a basin overflow hole in preventing flooding and water damage.


As home safety awareness increased, the overflow hole became widely viewed as a basic protective feature.


Why Are Many Modern Basins Designed Without an Overflow?


In recent years, more designers and hotels have adopted the modern bathroom basin without overflow. Several factors drive this trend:


1. Cleaner, Minimalist Appearance

A basin without an overflow offers smoother lines and a unified surface, ideal for contemporary minimalist bathrooms.


2. Easier to Clean, No Hidden Hygiene Problems

The overflow tunnel is narrow and deep, often trapping dirt and odors. This is one of the common disvantages of basins without overflow, but for many homeowners, removing this tunnel makes the basin easier to clean overall.


3. Practical for Countertop Vessel Basins

Many vessel basins are deep bowl structures, meaning the overflow would have limited function. Manufacturers often remove it to simplify the design.


4. Material Limitations of Stone Basins

A stone basin without overflow design is typically carved from a solid block. Since it’s impossible to drill a curved internal overflow channel through stone, this material naturally leads to no-overflow basin models.


5. Ceramic Basins Still Support Overflow

In contrast, ceramic basin with overflow design remains common because ceramic molds can easily incorporate an internal overflow channel during production.


So, Do You Need an Overflow?


Both options are suitable; it simply depends on your household and usage habits.

✔ Basins With Overflow: Safer

  • Ideal for families—often considered the best design type for homes with kids
  • Prevents accidental flooding
  • Offers buffer time if someone forgets to turn off the faucet

✔ Basins Without Overflow: More Stylish

  • A clean, hole-free surface
  • Strong design identity in modern bathrooms
  • Easier to wipe and maintain


Conclusion


Does a basin need an overflow?

The answer: It depends on your priorities—there’s no right or wrong.

  • Prefer safety and peace of mind? Choose a basin with an overflow
  • Prefer clean aesthetics and modern simplicity? Go with a no-overflow design

Either choice works well when paired with the right pop-up drain and accessories.

If you ever need basin overflow ring replacement, no-overflow pop-up drains, or other basin fittings, Jielin Plumbing provides a full range of solutions for both overflow and no-overflow basins.

How to Adjust Water Fill Valve in Toilet Tank?

Toilet Fill Valve

Why Do You Need to Adjust the Toilet Fill Valve?


We often need to adjust the working water level when the toilet tank shows one of the following issues:

  • Water level too high:

When the water level rises above the overflow tube of the flush valve, water keeps flowing into the overflow tube. The fill valve cannot reach the shut-off point and continues running, causing water waste and increasing household water bills.

  • Water level too low:

The tank cannot store enough water to create a strong siphon in the toilet bowl. This results in weak flushing and poor waste removal.

  • Height mismatch after installation or replacement:

When a new fill valve is installed, its height must match the old one. Both the main body and the float position should be adjusted to a similar level.

  • Water-saving needs or different toilet designs:

Toilet tanks vary: some are tall and narrow, some are short and wide. You may need several adjustments to find the level that provides strong flushing power while saving water.


2. Two Common Types of Toilet Fill Valves


It uses a lever with a float ball to sense water level changes. As the float rises, it pushes the lever to stop water flow. However, it takes up a lot of space in the tank.

  • Float-cup fill valve:

This modern, space-saving design is the mainstream option for most toilet tank systems today. The dual-float structure helps maintain stable refill speed and ensures quick shut-off when the water level is reached.


3. Preparations Before Adjusting the Fill Valve


  • Turn off the water supply (angle valve).
  • Remove the toilet tank lid.
  • Confirm the type and structure of your fill valve.
  • Locate the adjustment mechanism: screw, sliding rod, float clip, or adjustment tab.


4. How to Adjust the Toilet Fill Valve?


1) Float-cup Fill Valve (Mainstream Design)

  • Coarse adjustment:

Most adjustable fill valves consist of two sections. Remove the locking clip or pin between them to raise or lower the valve height when the difference between actual and desired water level is large.

  • Fine adjustment:

Locate the adjustment screw or lever near the float cup and turn it clockwise or counterclockwise to fine-tune the water level.

Note: Some designs adjust only the inner float height. After that, make sure the outer float is also set to the same height.

  • Water level reference:

Fill until the water reaches the tank mark or sits about 1.5cm below the top of the overflow tube.


2) Float-ball Fill Valve (Traditional Design)

  • Coarse adjustment:

Metal rods can be bent slightly to raise or lower the water level.

For plastic-rod designs, loosen the knob at the joint area to adjust the float height.

  • Fine adjustment:

Some float balls can be screwed upward or downward to fine-tune the water level.

  • Water level reference:

Same as above—tank mark or about 1.5cm below the overflow tube top.


5. How to Test After Adjustment


  • Turn on the water supply and let the tank refill.
  • Check if the water reaches the correct level marking.
  • Inspect the fill valve base and connections for leakage.
  • Listen to the refill sound: a good valve should stop instantly without dripping.
  • Flush to confirm strong siphon and smooth waste removal in the toilet bowl.
  • Run 3–5 cycles to ensure stable water level and proper shut-off.


6. Conclusion


1) Choose a height-adjustable and high-compatibility toilet fill valve.

2) Select quiet-refill and water-saving certified products for better performance and lower long-term water cost.

3) Jielin Plumbing Fill Valve Advantages:

  • 3-year warranty and durable construction
  • Multi-level height adjustment compatible with most toilet tank designs
  • Quick shut-off technology for stable water level

4) Water level adjustment is simple and easy for most users.

5) Proper adjustment improves flushing power and reduces water waste.

6) Replace the fill valve when it becomes noisy, unstable, or difficult to adjust.

How to Flush a Toilet with Two Buttons?

The dual flush toilet has become widely used for its water-saving and efficient performance. Compared with traditional single-button toilets, a two button toilet flush allows users to choose different flush volumes according to their needs, helping to conserve water and reduce waste.

However, many people still don’t know the difference between the two buttons. They often press both at the same time, which can still flush the toilet but eliminates the water-saving advantage of the design. So how should you properly use a dual flush toilet? Let’s take a closer look.


1. Understanding the Structure of a Dual Flush Toilet


A two button toilet typically has two buttons of different sizes:

  • Small button (Half Flush): Used to flush liquid waste, usually with less water (around 3 liters).

  • Large button (Full Flush): Used to flush solid waste, using more water (around 6 liters).

These two functions are controlled by a dual flush valve inside the cistern. Each button activates a different discharge path, allowing a balance between water conservation and flushing power.


2. How to Use the Two Buttons Correctly


Choose the right button for each use:


  • For liquid waste, press the half flush button lightly to complete a small flush.

  • For solid waste or when more paper is used, press the full flush button for a stronger flush.


Press firmly and release quickly:
Light or hesitant pressing may result in incomplete flushing or the button getting stuck.
Press the button evenly and release it quickly so that the flush valve can open and close properly.
Especially when using the half flush function, a quick release is important — if you hold it down too long, the system will perform a full flush instead, losing its water-saving effect.


Keep the buttons and cover clean:
Over time, limescale or dust can affect button sensitivity. Wipe the surface regularly with a damp cloth to maintain smooth and responsive operation.


3. What to Do If the Dual Buttons Don’t Work


If you notice:

  • The button doesn’t respond or gets stuck

  • The flush is weak or incomplete

  • Water keeps running continuously

  • Flushing stops immediately after releasing the button

These issues are often caused by an aged flush valve, sticking buttons, or worn seals.
You can try the following:

  • Check if the button assembly is loose.

  • Remove the tank lid and press or lift the dual flush valve manually to see if it functions properly.

  • If damaged, replace it with a compatible flush button or dual flush valve kit of similar size.

4. Water-Saving Tips


The greatest benefit of a dual flush toilet is water efficiency. According to tests, proper use of a dual flush system can save thousands of liters of water each year. Learning how to use a dual flush toilet correctly not only reduces your water bills but also helps protect the environment.

How to Replace Toilet Flush Handle?

In everyday use, the toilet flush handle is one of the most frequently operated parts of a toilet. Over time, it may become loose, broken, or stuck, which can prevent the toilet from flushing properly. Fortunately, replacing a toilet flush handle is quite simple — with just a few basic tools, the whole process can be completed within minutes.

This article will walk you through the detailed steps and precautions for toilet flush handle replacement.


1. Prepare Tools and Materials


Before starting, make sure you have the following items ready:

  • New flush handle (Toilet Tank Handle): Confirm whether it’s a side-mount or front-mount type, and make sure it matches the hole size on your toilet tank.
  • Wrench or pliers: These are useful for removing the old handle nut, especially if the nut has become tight or corroded over time.


2. Remove the Old Flush Handle


Turn off the water supply and empty the tank

Turn the shut-off valve clockwise to close the water supply, then press the handle to drain all the water from the tank.


Remove the tank lid

Carefully take off the ceramic or plastic lid and place it somewhere safe to avoid damage.


Detach the chain

Disconnect the chain attached to the handle lever and hang it temporarily on the overflow tube of the flush valve.


Loosen the mounting nut

The handle is usually secured inside the tank with a plastic nut. Note that this nut is reverse-threaded, meaning you’ll need to turn it clockwise to loosen it.


Take out the old handle assembly

Once the nut is loose, remove the handle and lever assembly from the outside of the tank.


3. Install the New Flush Handle


Insert the new handle into the hole

From the outside of the tank, insert the new handle into the original hole. Make sure it faces the correct direction (upward or sideways).


Tighten the mounting nut

From inside the tank, hand-tighten the nut counterclockwise. Do not overtighten, as it could crack the plastic nut.


Connect the lever to the flush chain

Attach the new handle’s lever to the flush chain inside the tank. The chain length should be moderate — if it’s too long, flushing may be weak; if too short, water may continuously leak.

A useful tip: pull the chain straight to compare with the lever length, then adjust the hook position before attaching it.


4. Test and Adjust


Turn on the shut-off valve and let the tank refill.

Press the handle to check if the flush is smooth and if the flapper closes completely.

If the flush is weak or the water keeps running, adjust the chain length or handle angle as needed.


5. Maintenance Tips


  • Avoid pressing the handle too forcefully.
  • Check the mounting nut periodically to ensure it’s secure.
  • Replace the handle if it becomes rusty (for metal ones) or brittle (for plastic ones) to keep the flushing system working properly.


Conclusion


Replacing a toilet flush handle is a simple yet useful home maintenance skill. With just a few easy steps, you can restore your toilet to normal operation.

If you need to purchase high-quality toilet flush handles, flush valves, or fill valves in bulk, please contact Xiamen Jielin Plumbing Co., Ltd.

We provide reliable and durable sanitary solutions for customers around the world.

How to Adjust Toilet Flush Valve Water Volume?

During daily use, many users encounter weak flush power, high water usage, incomplete waste removal. These issues often signal that the flush valve inside the toilet tank requires a new water volume setting. Although toilet structures vary, most household toilets share similar logic for flush volume adjustment. This guide explains core principles, adjustment methods, and practical checks that help complete the process in 23 minutes.


1. Why Adjust Flush Valve Water Volume?


You may need to adjust flush volume in the following situations:

l  Weak flush performanceLow water level or low discharge volume may reduce siphon strength.

l  High water consumptionToilet tank drains unnecessary amounts during every flush.

l  New flush valve replacementHeight difference between old and new valve requires a new water level setting.

l  Water saving demandHalf flush and full flush need minimum water while still achieving effective flushing.


2. Key Principles That Influence Flush Volume


Flush volume depends on several internal elements:

l  Overflow tube heightControls maximum water line inside the tank.

l  Half flush float heightControls half flush water volume.

l  Full flush adjustment plate openingControls full flush water volume.


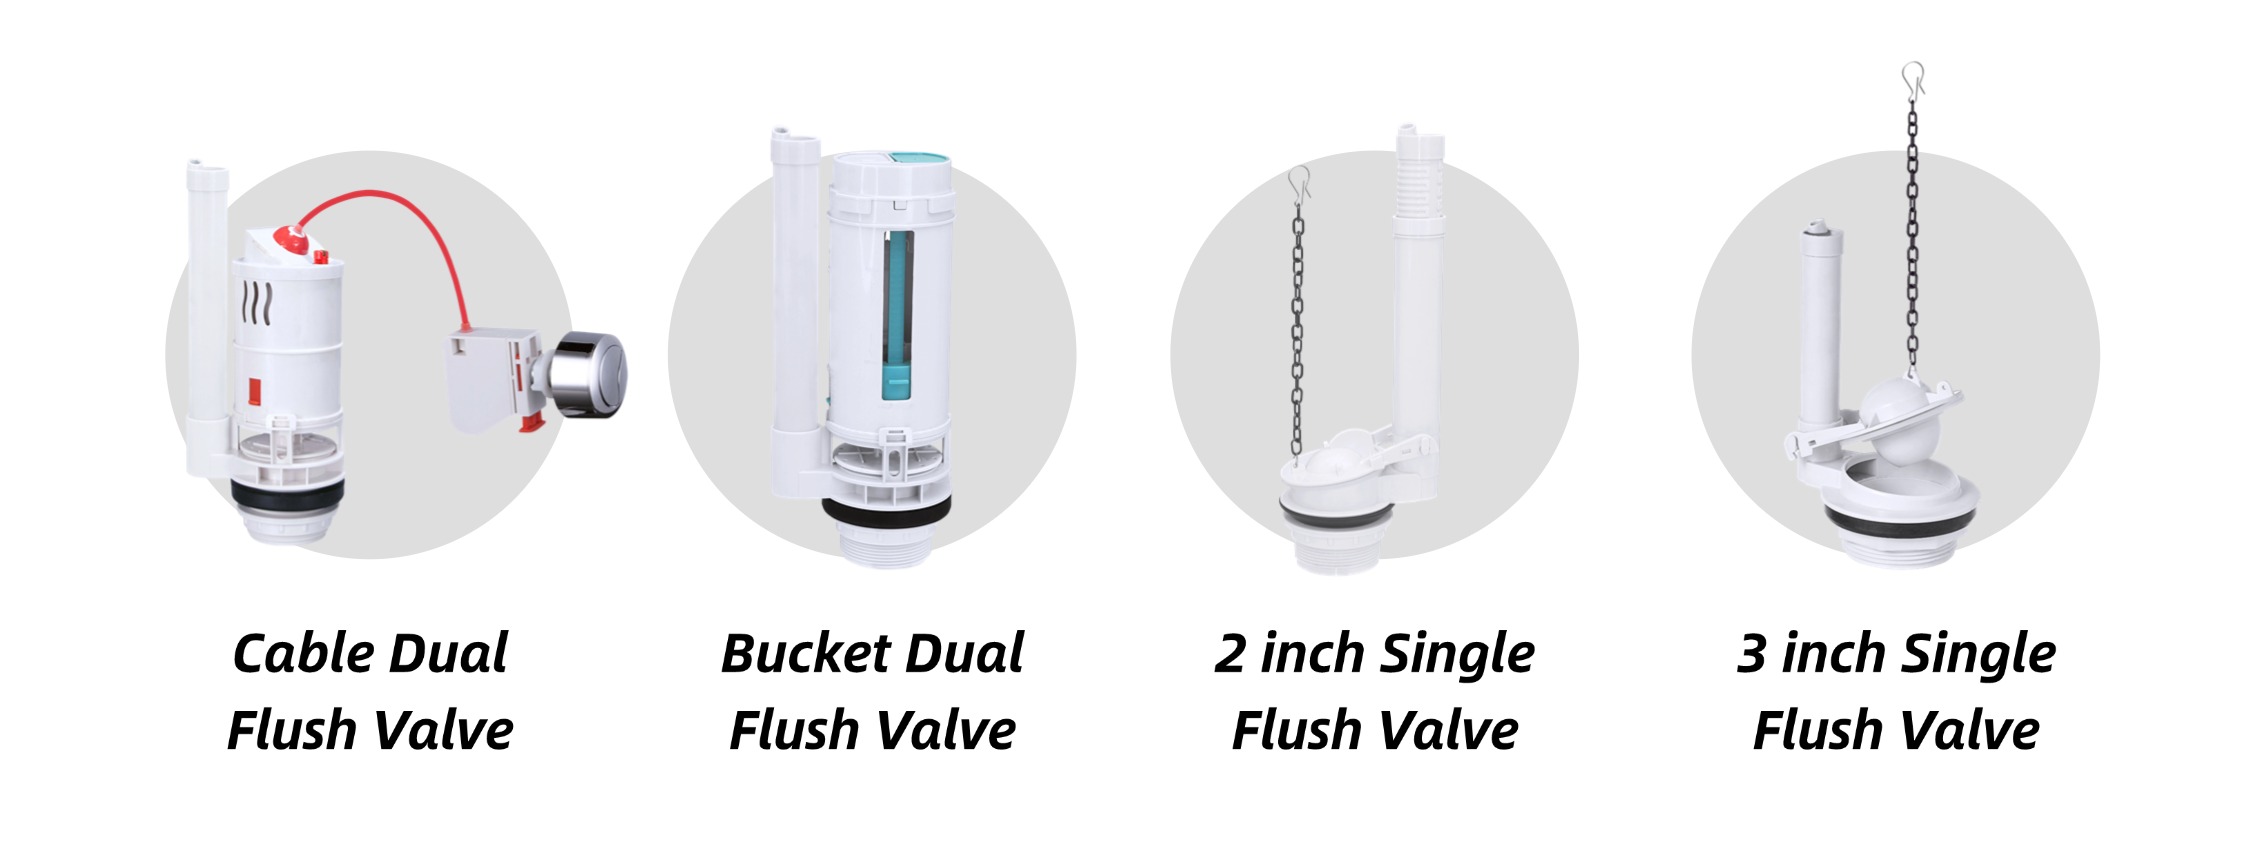
3. How to Adjust Flush Valve Water Volume?


1Adjust Overflow Tube Height


Overflow tube height sets maximum tank water level, which defines maximum available flush volume.

This method becomes the simplest adjustment for single flush push button flush valves.

For canister-type flush valves, this method works together with additional components for finer adjustment.


2Adjust Half Flush and Full Flush Water Ratio


Most canister-style dual flush valves support independent adjustment for half flush water volume and full flush water volume.


(1) Half Flush Adjustment


Half flush adjustment has two methods:

direct movement for the half flush float height, or indirect adjustment through a top knob on the flush valve.

l  Half flush float moves upward half flush water volume becomes lower

l  Half flush float moves downward half flush water volume becomes higher


(2) Full Flush Adjustment


Full flush adjustment usually relies on an adjustment plate located at the bottom area for the flush valve.

This adjustment plate controls the release speed inside the full flush chamber.

When water inside the full flush chamber drains out completely, the full flush float drops under gravity and shuts the outlet, ending the full flush.

Therefore, the release speed inside the full flush chamber decides full flush duration:

l  Longer duration higher full flush water volume

l  Shorter duration lower full flush water volume

When the opening window controlled by the full flush adjustment plate becomes larger, full flush water volume becomes lower.

When the opening window becomes smaller, full flush water volume becomes higher.


4. How to Confirm Best Flush Volume?


Perform multiple flush tests:

l  A small paper group inside the toilet bowl drains smoothly

l  Waste removal completes in one flush

l  Half flush meets water saving demand

l  No overflow and no leakage inside the tank

If all checks pass, the flush valve reaches an optimal setting.


5. Summary


Flush valve adjustment focuses on three essential steps:

l  Set overflow tube height around 23 cm below tank rim

l  Adjust half flush and full flush opening sizes

l  Raise or lower water level to control flush strength

A short adjustment process upgrades flush performance and improves water efficiency for everyday use.